By Radomir Drndarski and Olly John
Why build a real-time speech-to-speech translation app?
As our lives and interactions continue to become increasingly globalised, it’s increasingly likely that you will need to communicate with others who don’t necessarily speak or understand your language, and whose language you don’t necessarily speak or understand either.
We’ve all witnessed situations where people resort to speaking slower and louder, often with mixed results. But what if we had an application that could take what we were saying in our own language, in real-time and translate it into a language the person we’re trying to talk to understands and says it for us?
This blog post aims to provide a high-level explanation of how to develop an application that achieves the objective set out above. How? By effectively leveraging the Web Speech API to capture audio and convert it into text and APIs from Google Cloud Platform to translate that text into a given language as well.
Comparison of technologies we considered
When we started out with this project, we considered two options for the speech-to-text component — OpenAI’s Whisper, and Google Cloud’s Speech-to-Text.
With the primary requirement for this project being that the transcription and translation are carried out as close to real-time as possible, we were immediately presented with a limitation with OpenAI’s solution. This is because (as of the time of writing) they do not provide any streaming or real-time capabilities for their transcription API.
We investigated chunking the audio files (breaking down and sending in small chunks) as a workaround, but this came with its own limitations:
Optimal chunk duration: Using short chunks feels more responsive. However, it often leads to inaccurate transcriptions due to a lack of context. Furthermore, larger chunks naturally degrade the user experience as it will take longer for the request to be sent and processed, adding latency to the whole process.
Streaming: This might seem obvious, but this approach requires sending every individual chunk of audio in its own HTTPS request, which adds a certain overhead to the latency.
Rate limits: OpenAI has strict rate limits in place on the transcription API, which would likely prove prohibitive to this approach with even a moderate amount of traffic.
Possible mitigations for the above issues might include self-hosting the model, but this would come with a significant cost and expertise which aren’t commonplace.
We then checked to see if the Google Cloud Speech-to-Text API would be a more suitable solution. Google Cloud’s Speech-to-Text exposes a gRPC streaming interface via a Node.js client library, providing a more suitable experience for this use case.
The Speech-to-Text API is capable of consuming a stream of audio chunks, iteratively generating, improving a transcription and finalising it once the end of an audio stream is reached.
However, there are some drawbacks to using the GCP option over OpenAI’s, including:
Out of the box, transcription quality appears to be lower. This may be mitigated with some tuning of the model or tweaking parameters but, in the interest of fairness, we compared them in their most basic states.
Slower performance compared to a benchmark with OpenAI. This might seem like a problem but the ability to stream the audio in and text out somewhat conceals this so the user experience isn’t particularly degraded.
The third option we looked into is the Web Speech API. It enables us to incorporate speech recognition and speech synthesis into a web application, without the need for any external APIs for speech recognition, as it’s built into the browser. Using the WebSpeech API gives us the following advantages in comparison to the other options:
It eliminates the need to handle recording, chunking and sending the audio stream
Low latency for transcription results — transcription happens as soon as speech is detected
Of course, there are some things to be mindful of when using WebSpeech API:
Not all browsers have implemented all the features yet (see this comparison)
Not all the spoken languages have their native SpeechSynthesis available
Building an app that utilises Web Speech API and Google’s Cloud Translation service
Google’s documentation for the setup of the Cloud Translation API is easy to follow and sufficiently detailed to get you up and running with a working integration. All you need to do is enable the API in your GCP project and you’re ready to start building.
Application stack
Besides the cloud technologies used for the translations, the application that the user actually interacts with utilises JavaScript on both the front and back end.
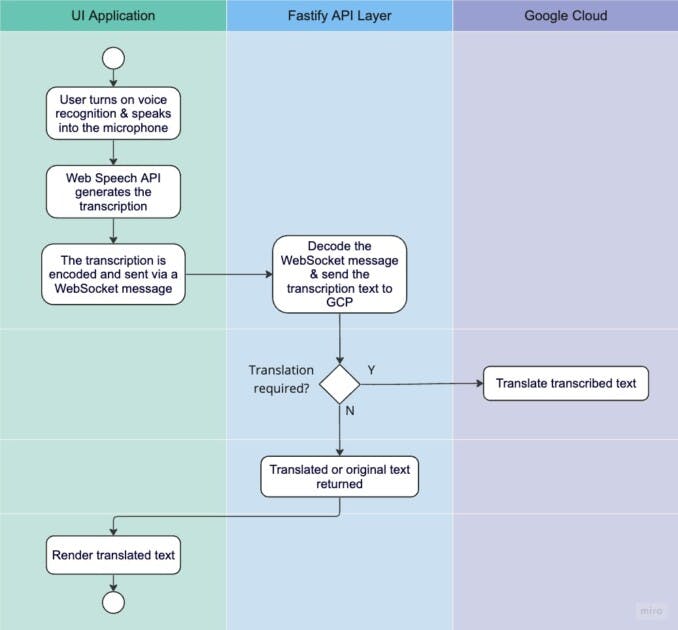
The server is written using Fastify, and the UI application is written with React and TypeScript, using Vite.js for the scaffolding. The UI communicates with the server primarily using WebSockets, enabling us to efficiently stream data back and forth.
High-level overview of the process
Frontend
Without going too in-depth into our UI code, the core piece of functionality that’s required to get this working is utilising the Web Speech API to transcribe the received audio input from the user’s device and send this data to the backend via a WebSocket.
// Initializing the speech recogniton
const recognition = window.SpeechRecognition
  ? new window.SpeechRecognition()
  : new window.webkitSpeechRecognition()

recognition.continuous = true
recognition.interimResults = true
recognition.lang = "en"

// Set the results handler
recognition.onresult = (event: SpeechRecognitionEvent) => {
    let interimTranscript = ''

    for (let i = event.resultIndex; i < event.results.length; ++i) {
            // In Chrome, result is final when speech stops for ~500ms-1s
      if (event.results[i].isFinal) {
        const finalTranscript = event.results[i][0].transcript
        // Do something with the final result...
      } else {
                // Interim result
                // For example: each spoken word or pair of words
        // Do something with the interim result...
      }
    }
  }

//...//

recognition.start()
Snippet of how to set up SpeechRecognition and capture the transcribed results
import useWebSocket, { ReadyState } from 'react-use-websocket'

export const Container = () => {

  const { readyState, sendMessage } = useWebSocket(WS_URL, {
    onMessage: (event: MessageEvent) => {
            // decode the message first
      const decoder = new TextDecoder()
      const message = JSON.parse(decoder.decode(event.data as ArrayBuffer))
            // do something with the message
    }
  })

    // ... //

  const sendRecordedTranscript = (transcription: string): void => {
    if (readyState === ReadyState.OPEN) {
            // send the transcribed text to the server for translation
      sendMessage(transcription)
    } else {
      console.warn('WebSocket not in a ready state, message will not be sent.')
    }
  }

  return (
    // ... //
  )
}
Snippet of how to set up WebSockets to receive/send the data to the server
Backend
GCP Client Integration
With the UI now in a position to capture audio data and send transcripts to the backend, we need to set up an endpoint capable of receiving that data and interacting with GCP to translate it. We created our API using Fastify so we wrote our GCP integration as a Decorator in order to easily initialise and use them, but you can easily create an instance of the Translation client in your choice of architecture with the below snippet:
import { v2 } from "@google-cloud/translate";

const client = new v2.Translate({
  // auth fields or credentials JSON here
});

// translate a string to a given language
client.translate(textToTranslate, { to: languageToTranslateTo })
    .then(([translatedText, metadata]) => {
        // do something with the output here
  });
Translating a string using GCP Translate
Wiring it up and creating a WebSocket for the UI to connect to
Creating a WebSocket with Fastify is easy and straightforward, you just need to install the @fastify/websocket package and register it as shown below:
import fastify from "fastify";
import fastifyWS from "@fastify/websocket";

const app = fastify();

app.register(fastifyWS);
With that done, you can set up a WebSocket endpoint as shown below:
app.get("/my-ws-endpoint", { websocket: true }, (connection) => {
  connection.socket.on("connect", () => {
    console.log("Connection established with remote client");
  });
  connection.socket.on("message", (message) => {
    // whatever processing logic you wish to run on receipt of a message
    // should go here
  });
  connection.socket.on("close", () => {
    // any cleanup/teardown logic should go here
  });
});
Creating a WebSocket
This will give you a WebSocket that you can communicate with from your UI at the URL ws://your-host-url/my-ws-endpoint. This is a very simple example to help you get started. For a more detailed example, including registering the GCP decorator mentioned in the previous step, feel free to check out the GitHub repository of the app we built — a real-time translation chat called fast-speech-to-text.
What it looks like
If you set up and run the application as described in the repository’s documentation, you’ll be presented with a screen where you can provide your name and language of choice. You can then create a chat room that somebody else can join.
We’ll assume that we have an English-speaking John Doe and an Italian-speaking Janet Doe. John creates a room called Demo and Janet joins it.
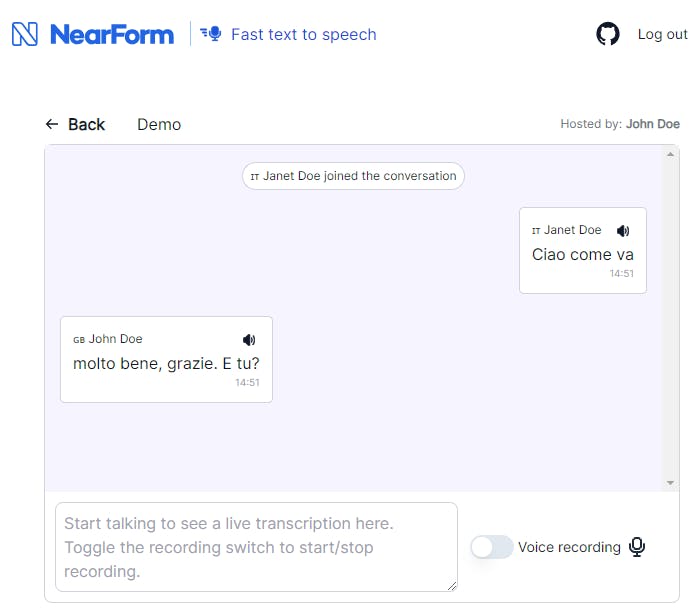
John will then speak English, and Janet will receive the Italian translation on her side of the chat, which will also be spoken out to her by the browser in Italian, almost instantaneously.
Janet’s side of the chat
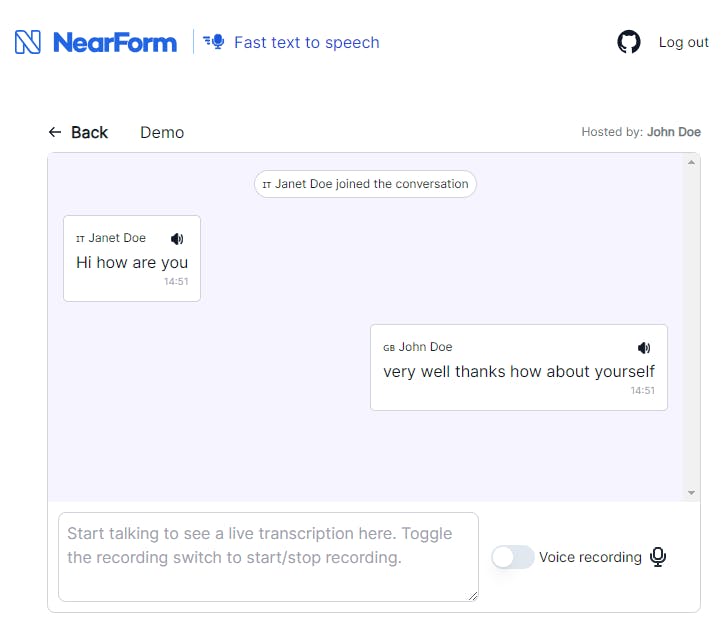
On the other side of the chat, Janet can speak Italian and her messages will be translated, sent and spoken out to John in English in real-time.
John’s side of the chat
So, what’s next?
So you’ve made it to the end of this blog post and you’ve got a simple application that can take an audio input, transcribe and translate it. That’s great, but it’s not a huge amount of use in isolation, so what potential real-life applications does this have? Let us know via one of our social channels.
If you are interested in learning more about the technology itself, follow us and check out our other experiments on our GitHub page.
And if you’d like to discuss how we can help your organisation leverage Web Speech API, Web sockets and Cloud Integrations and solutions, contact NearForm today. We’d love to chat with you about how we can take your organisation to the next level.


