We begin with an introduction to React Native and Fastify
What is React Native?
React Native is a framework that allows you to create native applications using web technologies like JavaScript and React. This means you can write your mobile apps mostly in JavaScript, and React Native will take care of translating your code into the native one.
If it’s not amazing enough already, the same JavaScript code may be used not only to generate native code for one platform, but to do it for multiple platforms. This includes not only mobile phones and tablets, but also TVs, macOS / Windows, web, and even VR headsets.
Sounds too good to be true? Well, in practice, you sometimes have to write platform-dependent code and adapt your application for it to work with some particular hardware. However, this same fact is exactly what allows you to use platform-specific features. One such feature on iPhones is Apple Wallet passes.
If you are an iPhone user, you have probably already used the Wallet app, which is essentially a way to organize in one place not only your credit and debit cards but any kind of passes, tickets, identity and reward cards, keys, etc…
This is so convenient that I don’t even remember when the last time was that I had to print a boarding pass or a movie ticket — I just always know that it’s in my Apple Wallet, available to use on my phone or Apple Watch whenever I need it. This also means that iOS users would be expecting this functionality to be implemented if your application has anything to do with passes, tickets, cards, etc…
Indeed, let’s say one of the features your application needs to have is creating a pass to an event your company is holding. Ideally, you would like people to be able to obtain an invitation to the said event and add it to their Apple Wallet app, so they’d be easily identifiable at the entrance. What if I tell you that you can implement all that using only (okay, technically it’s ‘mostly’) good old JavaScript?
To be more precise, we will be using React Native in combination with some JavaScript/Node.js libraries available from npm. Also, in order to have our passes completely customizable and secured with our signature, we will need to run a Node.js server on the backend.
What is Fastify?
Of course, when it comes to the Node server, you don’t have to use a framework at all, but we’ll be using Fastify (proudly sponsored by NearForm) which provides additional benefits in terms of speed and throughput compared to classic tools like Express or even a built-in Node.js HTTP server.
But, before we go any further, please keep in mind that, for the sake of simplicity, this guide assumes you are familiar with React (and/or React Native), command line, and are using MacOS (you can certainly develop for iOS using other environments, but related complications are outside of the scope of this blog post).
Preparing your React Native application
If you already have an existing React Native app (an Expo-managed one or a bare one, either is fine) you can skip this part. Otherwise, follow this React Native guide to set up your environment and create an Expo-based project. You can also refer to our react-native-apple-wallet-demo if you prefer to get the full version of the code described in this tutorial right away.
Typically, npx create-expo-app ReactNativeAppleWalletDemo, then cd ReactNativeAppleWalletDemo && npx expo start should get you up and running. Follow the instructions from Expo if you want to try it out in the simulator, or emulator, or on a real device. If all goes well you should see something like this:
Next, in order to be able to generate custom Apple Wallet passes, you will need to have an Apple Developer account and be enrolled in Apple Developer Program. The main reason for this is that security always plays an important role in all the parts, features, and applications of the iOS ecosystem. Wallet is no exception — every Apple Wallet pass needs to be signed using your Apple Developer certificate.
Finally, since our goal is to generate custom passes, we will need a backend server. In terms of infrastructure, it can be as simple as a Lambda function deployed on one of the cloud platforms, or as complex as a full-fledged backend connected to databases or some other forms of storage. In any case, this guide assumes you have Node.js installed and are comfortable with npm as a package manager (if you’re using yarn of yet another package manager then commands are pretty similar, but you will have to refer to corresponding documentation to figure them out).
Generating custom Apple Wallet passes
As we mentioned earlier, Fastify is one of the fastest Node.js frameworks currently available. It’s also extremely reliable and is being used by a lot of high-profile companies. Let’s take Fastify and create a simple server that will generate Apple Wallet passes for our application.
While in the root folder of your application, run mkdir server && cd server && npm init -y to create a server folder with package.json inside.
Next, we can add Fastify with npm i fastify, and while in the same ./server folder, create a file called index.js with the following content:
const fastify = require("fastify")({
  logger: true,
});

// Declare a route
fastify.get("/", function (request, reply) {
  reply.send({ status: "ok" });
});

// Start the server
fastify.listen({ port: process.env.PORT ?? 3000 }, function (err) {
  if (err) {
    fastify.log.error(err);
    process.exit(1);
  }
});
./server/index.js
If you now run node index.js and go to localhost:3000, you should see {"status":"ok"}, which means that you have your Fastify server up and running. Once it’s out of the way, we can proceed to generating passes.
In order to do that, we will use https://github.com/alexandercerutti/passkit-generator: add it to your server dependencies by running npm i passkit-generator while in the ./server directory.
However, before we can generate any passes, there are still a couple of things left to do. First, we need to create a model, which is a folder that contains all the data necessary to compose a pass. That includes files containing icons, thumbnails, backgrounds, etc…, as well as some additional information (e.g. pass type identifier, team identifier, various colours, and whatever you know that likely won’t be customized at runtime).
Note that you can also use a model stored outside of the file system, as well as create passes from scratch without a model per se. For the sake of simplicity, let’s assume that we will be working with a template folder containing model components.
You can either create a said model manually by following the official guidelines from Apple or just use a visual tool like Passkit Visual Designer provided by the authors of the Passkit Generator. That said, if you’re not worried about the customizations at this point and just want to have a working example, feel free to simply copy the folder from here.
As part of this step, you need to make sure your model has a file called pass.json. This file contains a description of your pass fields and assets. It also contains important identifiers like passTypeIdentifier, which we’ll generate later, and teamIdentifier, which you can look up in your Apple Developer Account.
Please keep in mind that even if you are using the example model folder from the repository, you need to edit pass.json to replace passTypeIdentifier and teamIdentifier with your own values matching those from your signing certificate (see below). If you don’t do this then you won’t be able to sign the passes properly.
Once you have all the necessary ones ready, put the files in a folder called ticket.pass inside the ./server directory.
The last step to take before we will be able to create our first Apple Wallet pass is generating certificates. Specifically, you will need to have developer and WWDR certificates. Ideally, those need to be read from a secure storage, but once again, for the sake of simplicity for this tutorial, we will simply create a ./server/cert folder and will store our files in it.
Now, you can follow this guide to generate your developer certificate as well as the key (make sure you have OpenSSL installed first). Let’s name those files signerCert.pem and signerCert.key, and place them in our cert folder. The last piece of the puzzle is Apple WorldWide Developer Relations G4 Certificate and you can simply download it from Apple PKI. You will need to convert it to pem with openssl x509 -inform DER -outform PEM -in .cer -out wwdr.pem and store it in ./server/cert/wwdr.pem as well.
Finally, we are ready to generate our first Apple Wallet pass. Let’s open ./server/index.js and add a new POST endpoint looking like this:
const path = require('path');
const fs = require('fs');
const crypto = require('crypto');
const fastify = require('fastify')({
  logger: true,
});
const { PKPass } = require('passkit-generator');

const certDirectory = path.resolve(process.cwd(), 'cert');
const wwdr = fs.readFileSync(path.join(certDirectory, 'wwdr.pem'));
const signerCert = fs.readFileSync(path.join(certDirectory, 'signerCert.pem'));
const signerKey = fs.readFileSync(path.join(certDirectory, 'signerKey.key'));

fastify.post('/', async (request, reply) => {
  const {
    name
  } = request.body;

  // Feel free to use any other kind of UID here or even read an
  // existing ticket from the database and use its ID
  const passID = crypto.createHash('md5').update(`${name}_${Date.now()}`).digest('hex')

  // Generate the pass
  const pass = await PKPass.from(
    {
      model: path.resolve(process.cwd(), 'ticket.pass'),
      certificates: {
        wwdr,
        signerCert,
        signerKey,
      },
    },
    {
      eventTicket: {},
      serialNumber: passID,
    },
  );

  // Adding some settings to be written inside pass.json
  pass.setBarcodes(passID);
  if (Boolean(name)) {
    pass.secondaryFields.push({
      key: 'name',
      label: 'Name',
      value: name,
    });
  }

  reply.header('Content-Type', 'application/vnd-apple.pkpass');

  reply.send(pass.getAsBuffer());
});

// Start the server
fastify.listen({ port: process.env.PORT ?? 3000 }, function (err) {
  if (err) {
    fastify.log.error(err);
    process.exit(1);
  }
});
./server/index.js
Let’s see what happens here, step by step.
First, we require some of Node’s built-in modules, including crypto, which we will be using to generate a unique passID by hashing the name from the body of our request concatenated with the current timestamp. As mentioned in the comments, you can use any other unique ID instead, including IDs from pre-generated passes stored in your database. We are also importing PKPass object from the Passkit Generator here in order to generate our pass, and, of course, Fastify.
Next, we are reading our certificates, as well as the signer key, from the file system. Since those don’t change between requests, we can do it outside of the route handler.
Ultimately, we can add our endpoint with fastify.post. Inside the corresponding handler, we read the attendee name from the body of the request. We then generate a unique pass ID, create the pass itself, add some extra fields, set the appropriate content type, and, finally, send the pass with the response as a buffer.
Specifically, the creation of a pass is happening within the following statement:
const pass = await PKPass.from(
    {
      model: path.resolve(process.cwd(), 'ticket.pass'),
      certificates: {
        wwdr,
        signerCert,
        signerKey,
      },
    },
    {
      eventTicket: {},
      serialNumber: passID,
    },
  );
As you can see, we need to provide a path to our model folder (ticket.pass) as well as all the certificates. We are also setting a serial number for the ticket to a unique value (just passID in our case) and a placeholder eventTicket field, which identifies the pass as an event ticket.
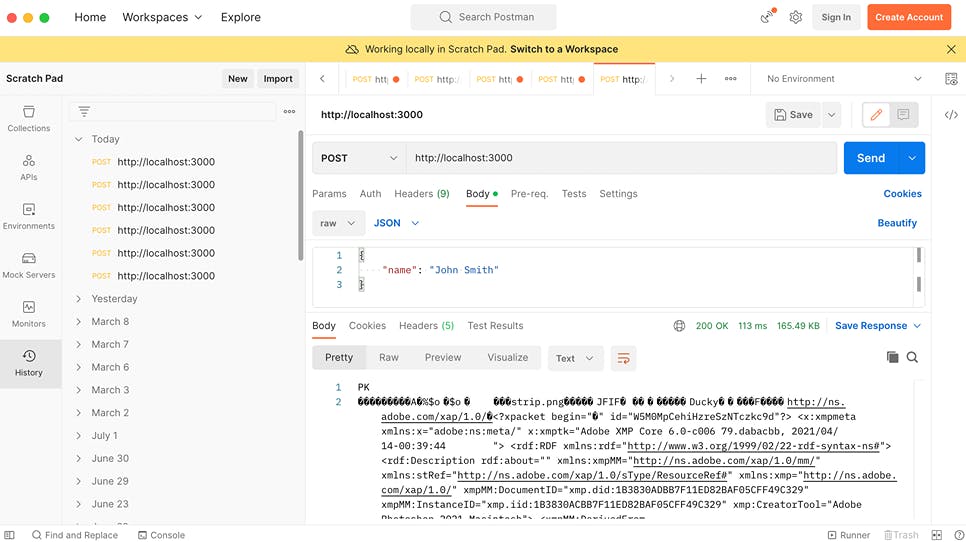
Let’s test it from the ./server folder, run node index.js. You should get a confirmation that your server is running at localhost:3000. The next step involves using Postman, curl, or any other tool that will let you make a POST request to localhost:3000. Use { "name": "John Smith" } as the request body.
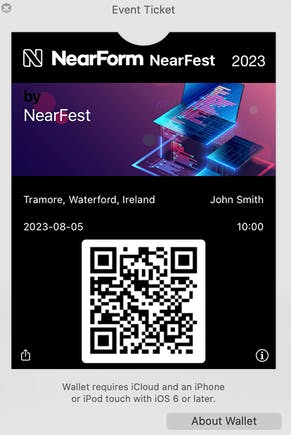
If all is done right, you should receive back a binary file that you can save under a name with a .pkpass extension, which will allow you to preview the pass with Pass Viewer built-in into MacOS:
Also, keep in mind that an Apple Wallet pass is essentially just an archive. So, if you save it with .zip extension instead, you can easily unpack it and see what’s inside, which can be very useful for debugging.
Note that the QR code generated here can actually contain a URL to access the complete pass information, so, once you scan it with a phone, it sends you to the corresponding page. Overall, however, it’s totally up to you to decide what to encode in that QR code or barcode.
As mentioned before, the server we have just implemented can be deployed separately as a Lambda function, or be a part of a more complex backend. However, since infrastructure details would be mostly outside of the scope of this tutorial, we will just use the local version. So let’s keep that localhost:3000 running. For similar reasons, we skip talking about authentication/authorization as well, but it should be pretty easy to figure out by following common guidelines for securing APIs.
Other than that, we’re done on the server side. So let’s get back to our React Native app, add a way to generate a pass from the app and add it to Apple Wallet.
Adding passes to Apple Wallet
The idea is simple: we will be calling our POST endpoint and passing the response to React Native Wallet Manager (a rework of React Native Wallet) which will trigger the add-to-wallet functionality on the phone. From the root folder of our React Native application, let’s run npm i react-native-wallet-manager to add the corresponding package to the application dependencies.
Moving on, let’s open App.js from the same directory. To keep it simple, we will place all of our code in the same main component, so the file will look like this:
import { useState } from "react";
import { StatusBar } from "expo-status-bar";
import {
  ActivityIndicator,
  Button,
  StyleSheet,
  Text,
  TextInput,
  View,
} from "react-native";
import WalletManager from "react-native-wallet-manager";

const blobToDataUrl = async (blob) =>
  new Promise((r) => {
    let a = new FileReader();
    a.onload = r;
    a.readAsDataURL(blob);
  }).then((e) => e.target.result);

export default function App() {
  const [name, setName] = useState();
  const [isLoadingPass, setIsLoadingPass] = useState(false);
  const handleChangeText = (value) => {
    setName(value);
  };
  const handleSubmit = async () => {
    // Skip if the name is not set
    if (!Boolean(name)) return;
    try {
      setIsLoadingPass(true);
      const pass = await fetch("http://localhost:3000", {
        method: "POST",
        headers: { "Content-Type": "application/json" },
        body: JSON.stringify({
          name,
        }),
      });
      const passBlob = await pass.blob();
      await WalletManager.addPassFromUrl(await blobToDataUrl(passBlob));
      setIsLoadingPass(false);
    } catch (e) {
      console.log(e);
    }
  };

  return (
    <View style={styles.container}>
      <View style={styles.labelContainer}>
        <Text style={styles.label}>Enter your name below please</Text>
        {isLoadingPass && <ActivityIndicator />}
      </View>
      <TextInput
        disabled={isLoadingPass}
        value={name}
        onChangeText={handleChangeText}
        style={styles.input}
      />
      <Button
        disabled={isLoadingPass}
        title="Get your pass now!"
        onPress={handleSubmit}
      />
      <StatusBar style="auto" />
    </View>
  );
}

const styles = StyleSheet.create({
  container: {
    flex: 1,
    backgroundColor: "#fff",
    alignItems: "center",
    justifyContent: "center",
  },
  input: {
    height: 40,
    width: "60%",
    margin: 12,
    borderWidth: 1,
    padding: 10,
  },
  label: {
    fontSize: 16,
  },
  labelContainer: {
    alignSelf: "center",
    flexDirection: "row",
    justifyContent: "space-between",
    width: "60%",
    height: 18,
  },
});
./App.js
Most of it is pretty standard React (React Native) code, so let’s only look at the handler that does most of the job:
  const handleSubmit = async () => {
    // Skip if the name is not set
    if (!Boolean(name)) return;
    try {
      setIsLoadingPass(true);
      const pass = await fetch("http://localhost:3000", {
        method: "POST",
        headers: { "Content-Type": "application/json" },
        body: JSON.stringify({
          name,
        }),
      });
      const passBlob = await pass.blob();
      await WalletManager.addPassFromUrl(await blobToDataUrl(passBlob));
      setIsLoadingPass(false);
    } catch (e) {
      console.log(e);
    }
  };
Here we are checking if the name is not empty (feel free to add an error message if it is), then setting the loading state and generating the pass via our backend — it’s still running at localhost:3000, right?
Once we receive the pass data, we convert it to a data URL using a simple blobToDataUrl helper and feed the result to the WalletManager which does the rest of the job for us. Keep in mind that working in this way means we don’t have to store the pass on the disk or in the database.
You can also use two endpoints on the server, a POST one to generate passes and store them somewhere, and a GET one to fetch them, so you would pass a remote URL to addPassFromUrl and drop the whole data URL part.
One important thing to remember before we take it for a spin is that adding passes to Apple Wallet is a completely native functionality that requires that we use native modules. That’s why it doesn’t work with Expo Go and you need to use a development build which can be created with EAS Build or locally on your computer (providing you have Xcode installed).
If you’re using an Expo-managed project, all you need to do is to run npx expo run:ios, and Expo will take care of everything, including installing npm dependencies, CocoaPods, etc. For a plain React Native / bare project follow the corresponding guide from the Expo docs.
Once your development build is running in a simulator, you will see something like this:
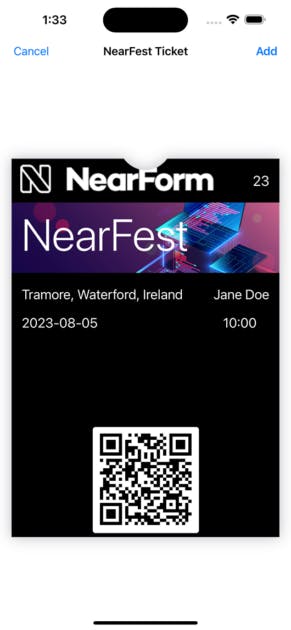
Go ahead and enter a name, then press the button below. After the loading state is cleared, you should be seeing something like this:
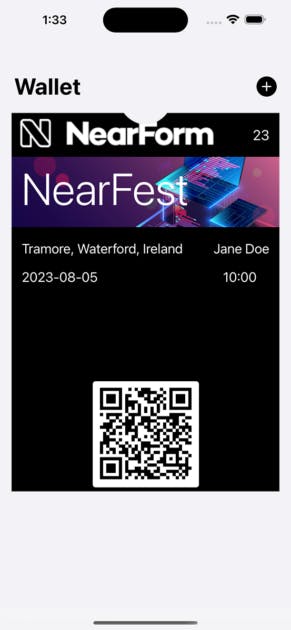
Once you press 'Add', you can switch to the Wallet app and see that it now holds your pass:
Conclusion
To summarize, here’s what we just did:
We created a sample React Native application to demonstrate the Apple Wallet functionality.
We used some npm libraries to build a Fastify server that generates event passes for Apple Wallet based on the attendee name.
We also connected it all together with React Native Wallet Manager to add custom Apple Wallet passes to our application.
Other than that, keep in mind that for all this to work you need to make sure you are:
Using a development build: Once you add React Native Wallet Manager to your application, you most probably won’t be able to run it with Expo Go at all.
Running it on an iPhone: iPads don’t have the Apple Wallet app, so trying this on an iPad will fail.
As you can see, this demonstrates how customizable React Native is — we were able to add some native functionality and use it alongside React code within the same application.
The only question left is, obviously, this one: how about Android and Google Wallet?
As universal as React Native is, features involving the use of native functionality often need separate handling depending on the platform. However, that’s a fair price to pay for having the majority of the code written in JavaScript and shared across most platforms.
Once again, refer to https://github.com/nearform/react-native-apple-wallet-demo for the full working version (minus certificates) of the code described in this tutorial, and happy ticketing!


